
ETABS BIM link for steel connection design (AISC)
1 How to activate the link
- Install the latest version of IDEA StatiCa
- Make sure you are using a supported version of ETABS – updates are published in the BIM section of the main website
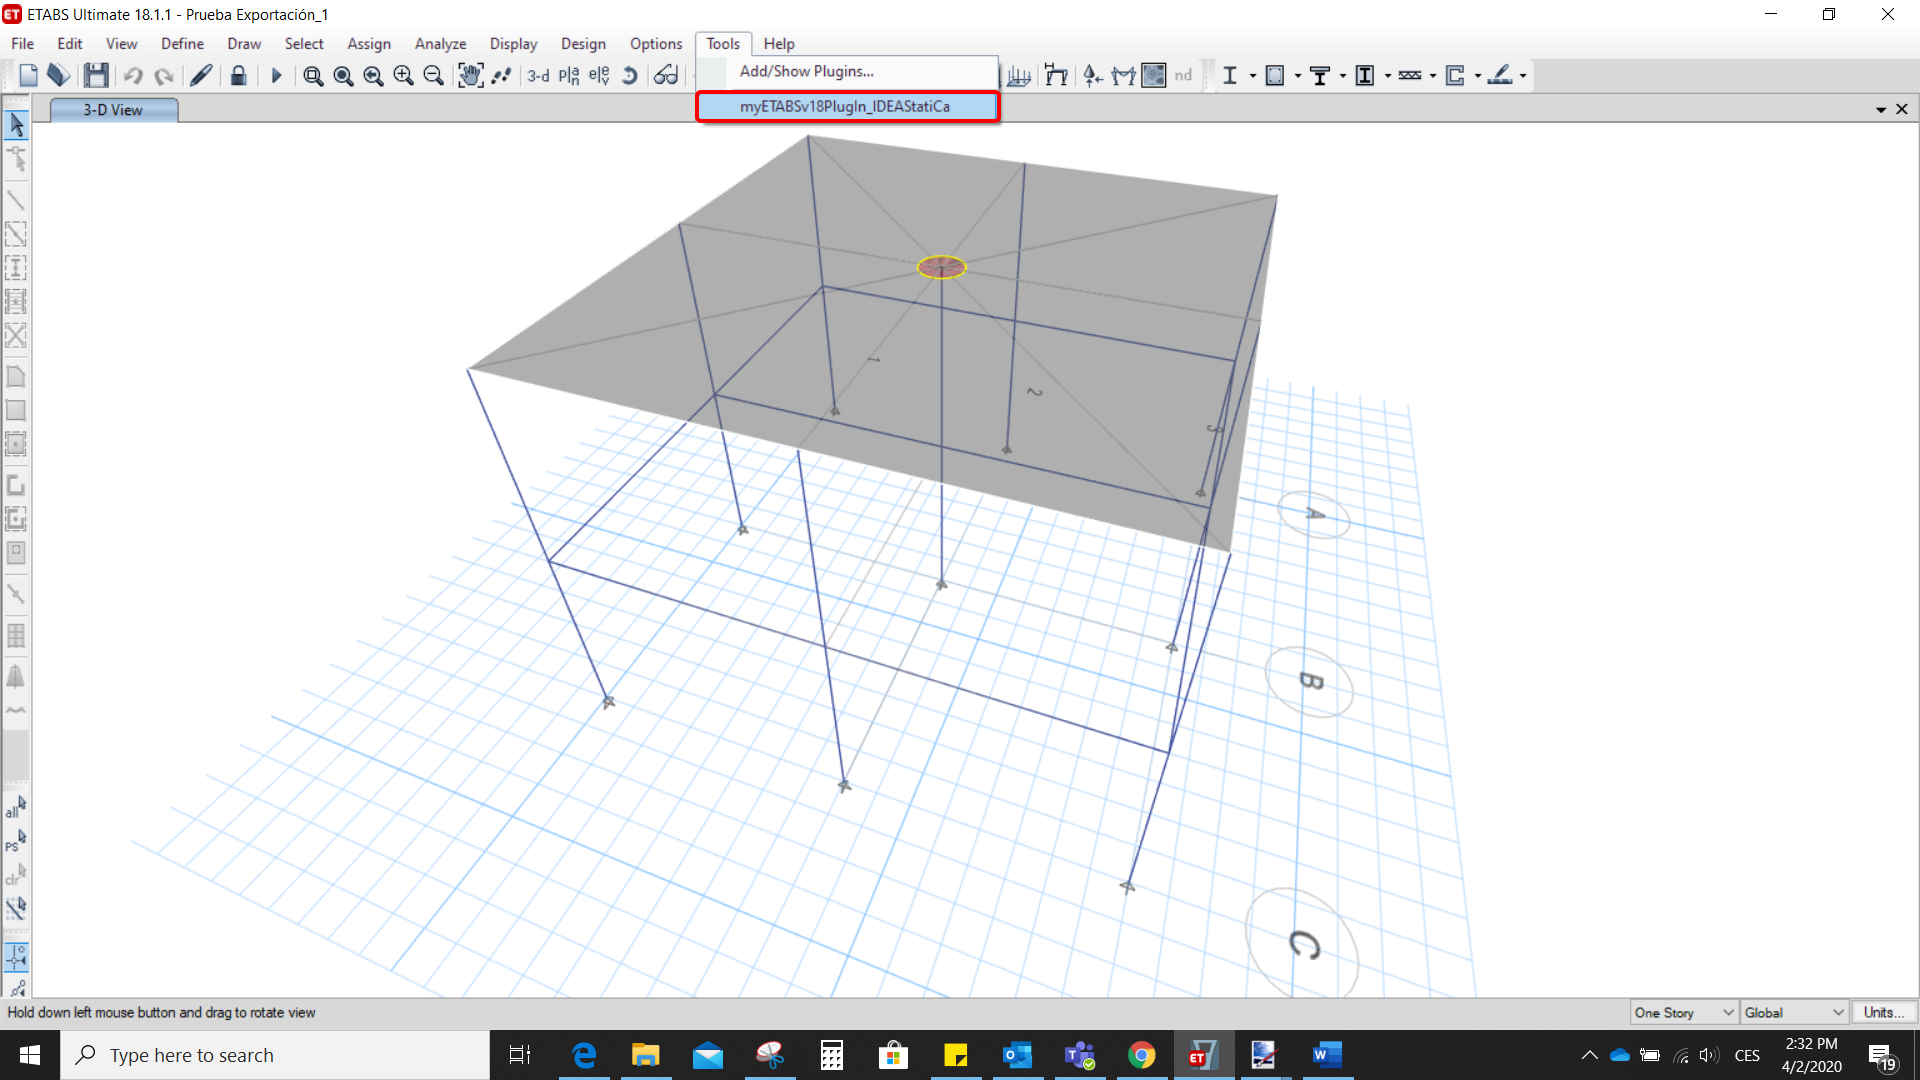
After installation of both programs, start ETABS and Click Tools > Add/Show Plugins to open the Plugin Manager dialog. This option lets you install and add add-ins (programs) to the appropriate places in the ETABS menu.
Browse for
C:\Program Files\IDEA StatiCa\StatiCa 20.0\ETABSv18PlugIn_IDEAStatiCa.dll
and click Add

2 How to use the link
Open the attached project in ETABS and run the analysis.
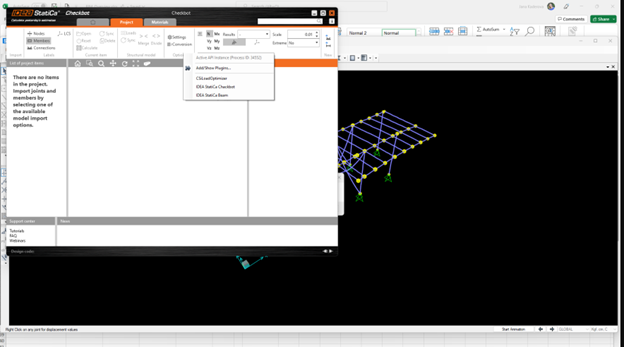
Go to the menu item Tools and run the export command you have just defined.
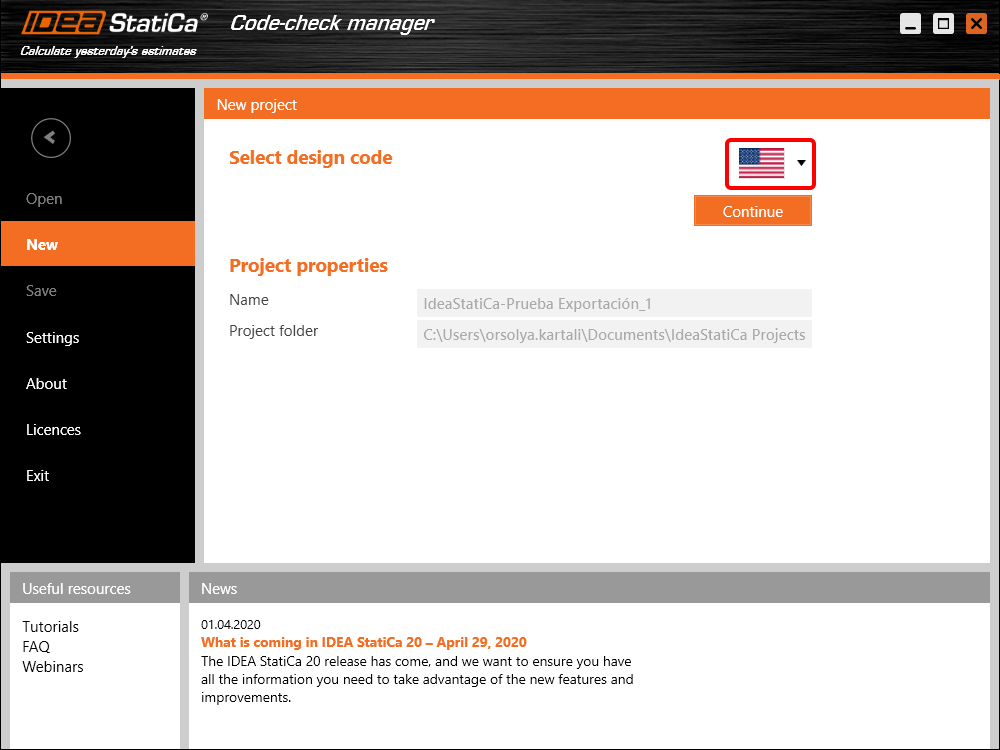
The Code-check manager opens and at first, you need to choose the code.
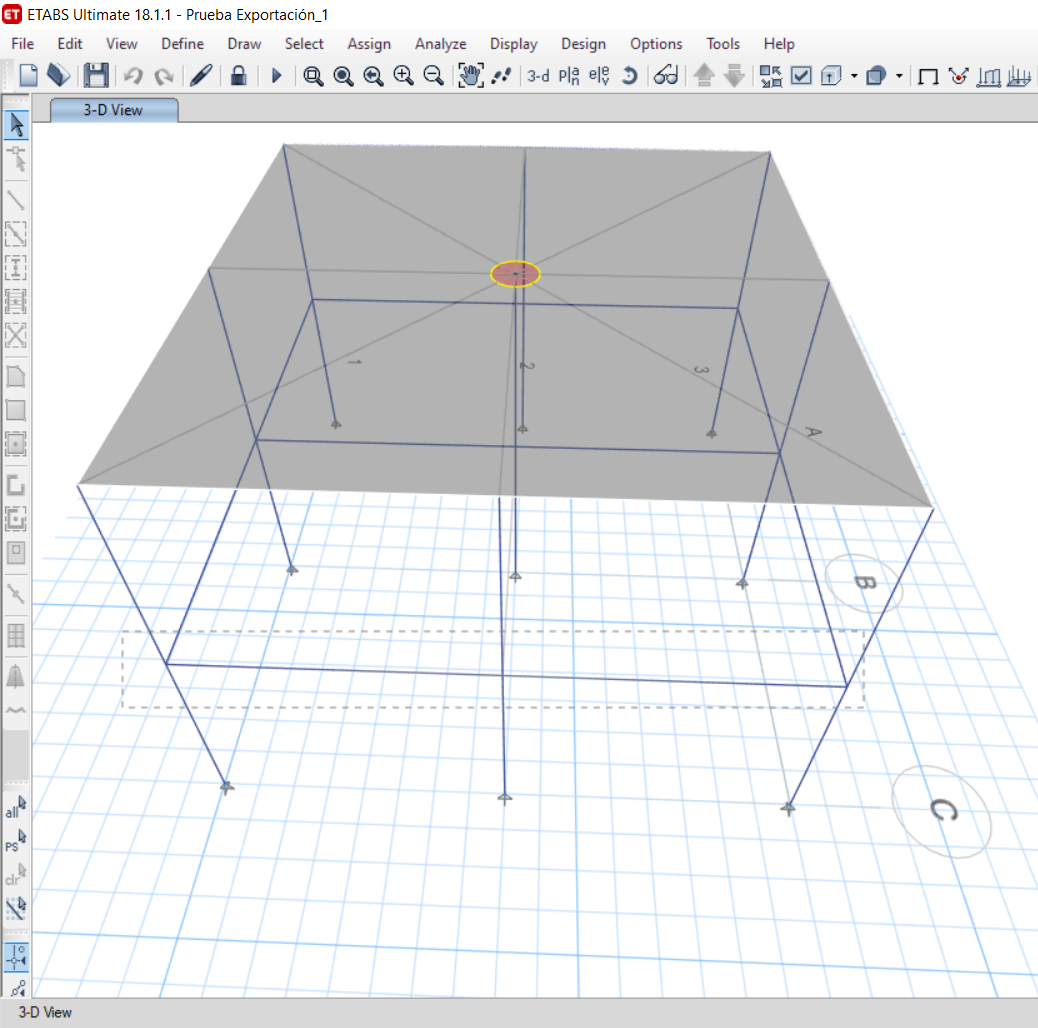
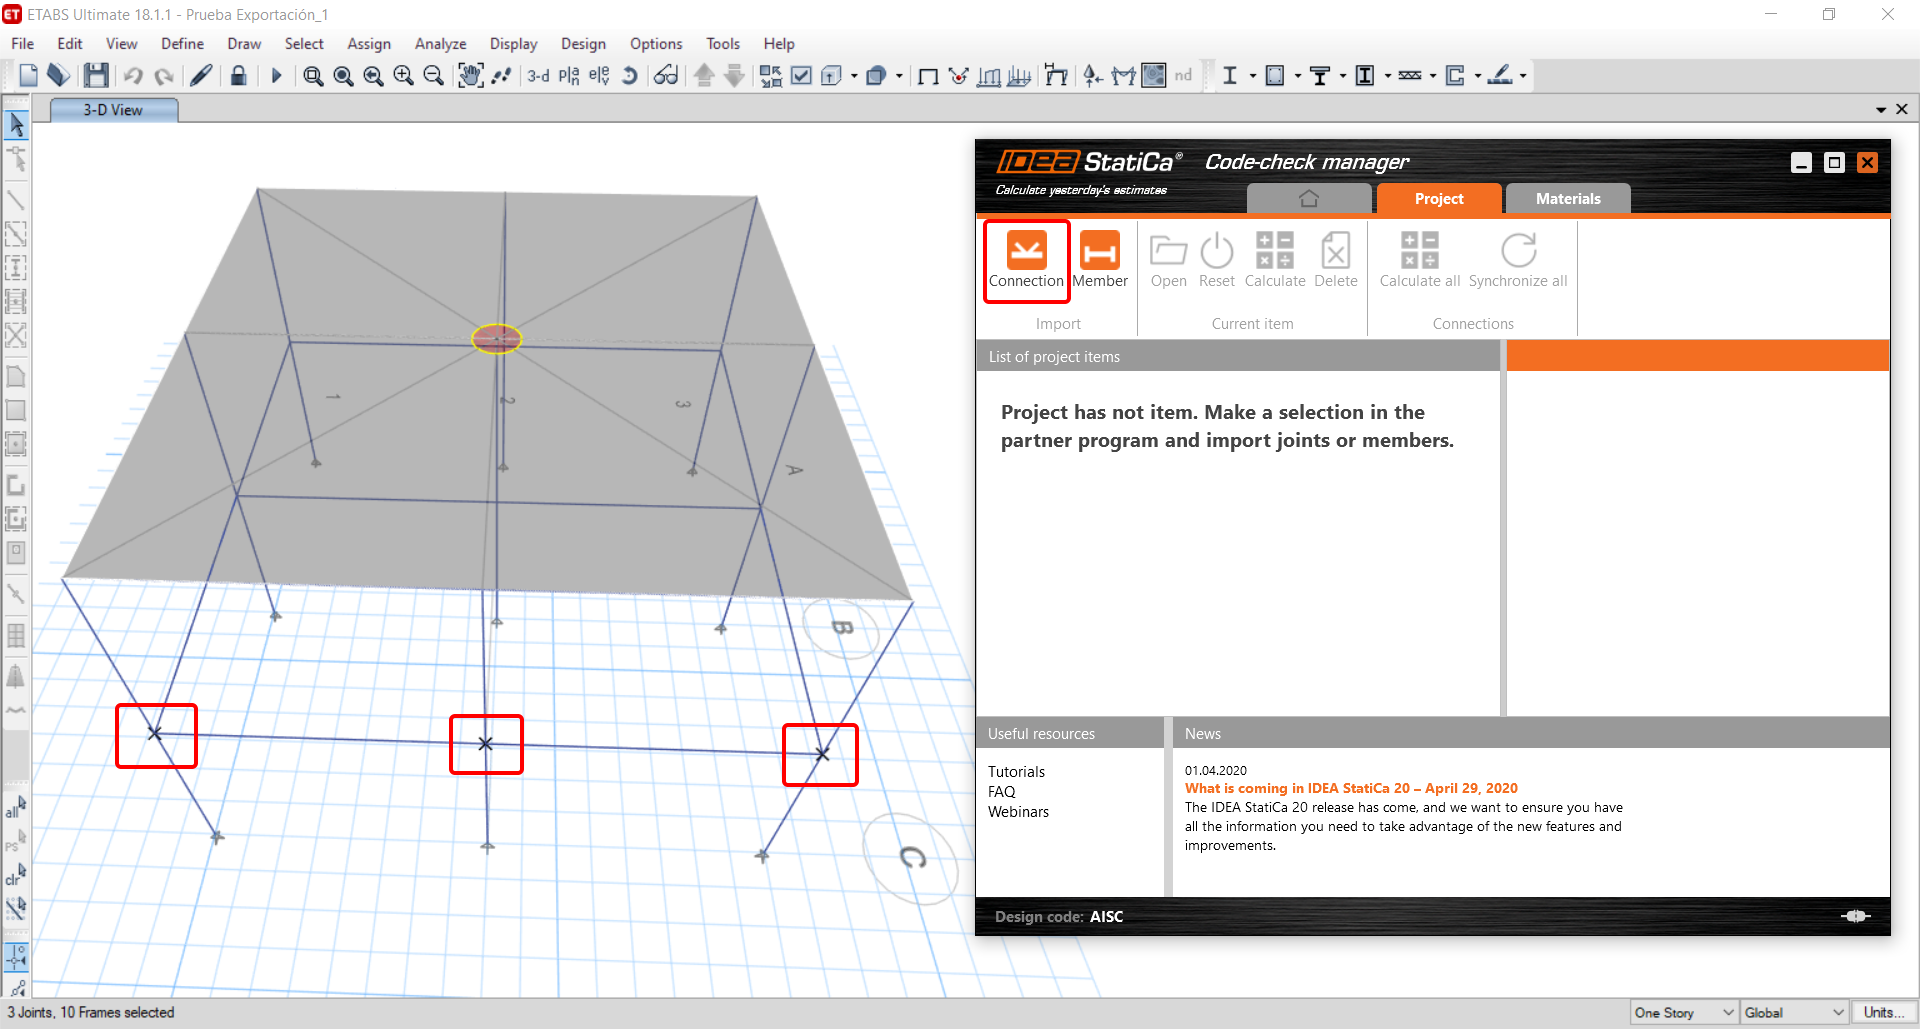
Then you can make a rectangular selection in the ETABS project to choose which joints you want to export. You can export more joints at once using the multiple selections.
If the joints are selected, you can click on the Connection button in the Code-check manager. With this, all the selected joints from ETABS will be imported into the Code-check manager.
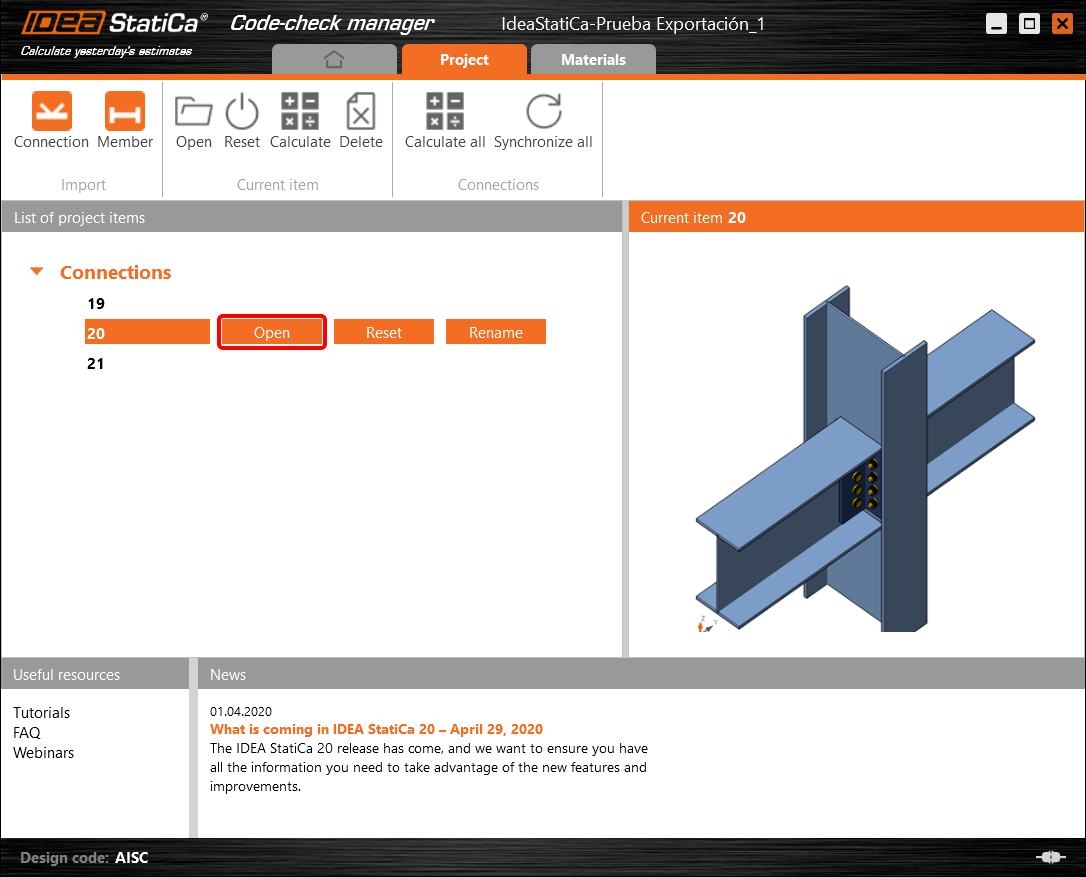
The next thing you need to do is to configure the joints in the Code-check manager. In this tutorial, you will only focus on one of the three imported joints, but the process would be the same for all of them.
You click on the joint on the left side (joint 20). On the right side, you can see the scheme of the joint, you can set the bearing member and merge the continuous members. After that, click on the Finish button to complete the configuration of the joint.
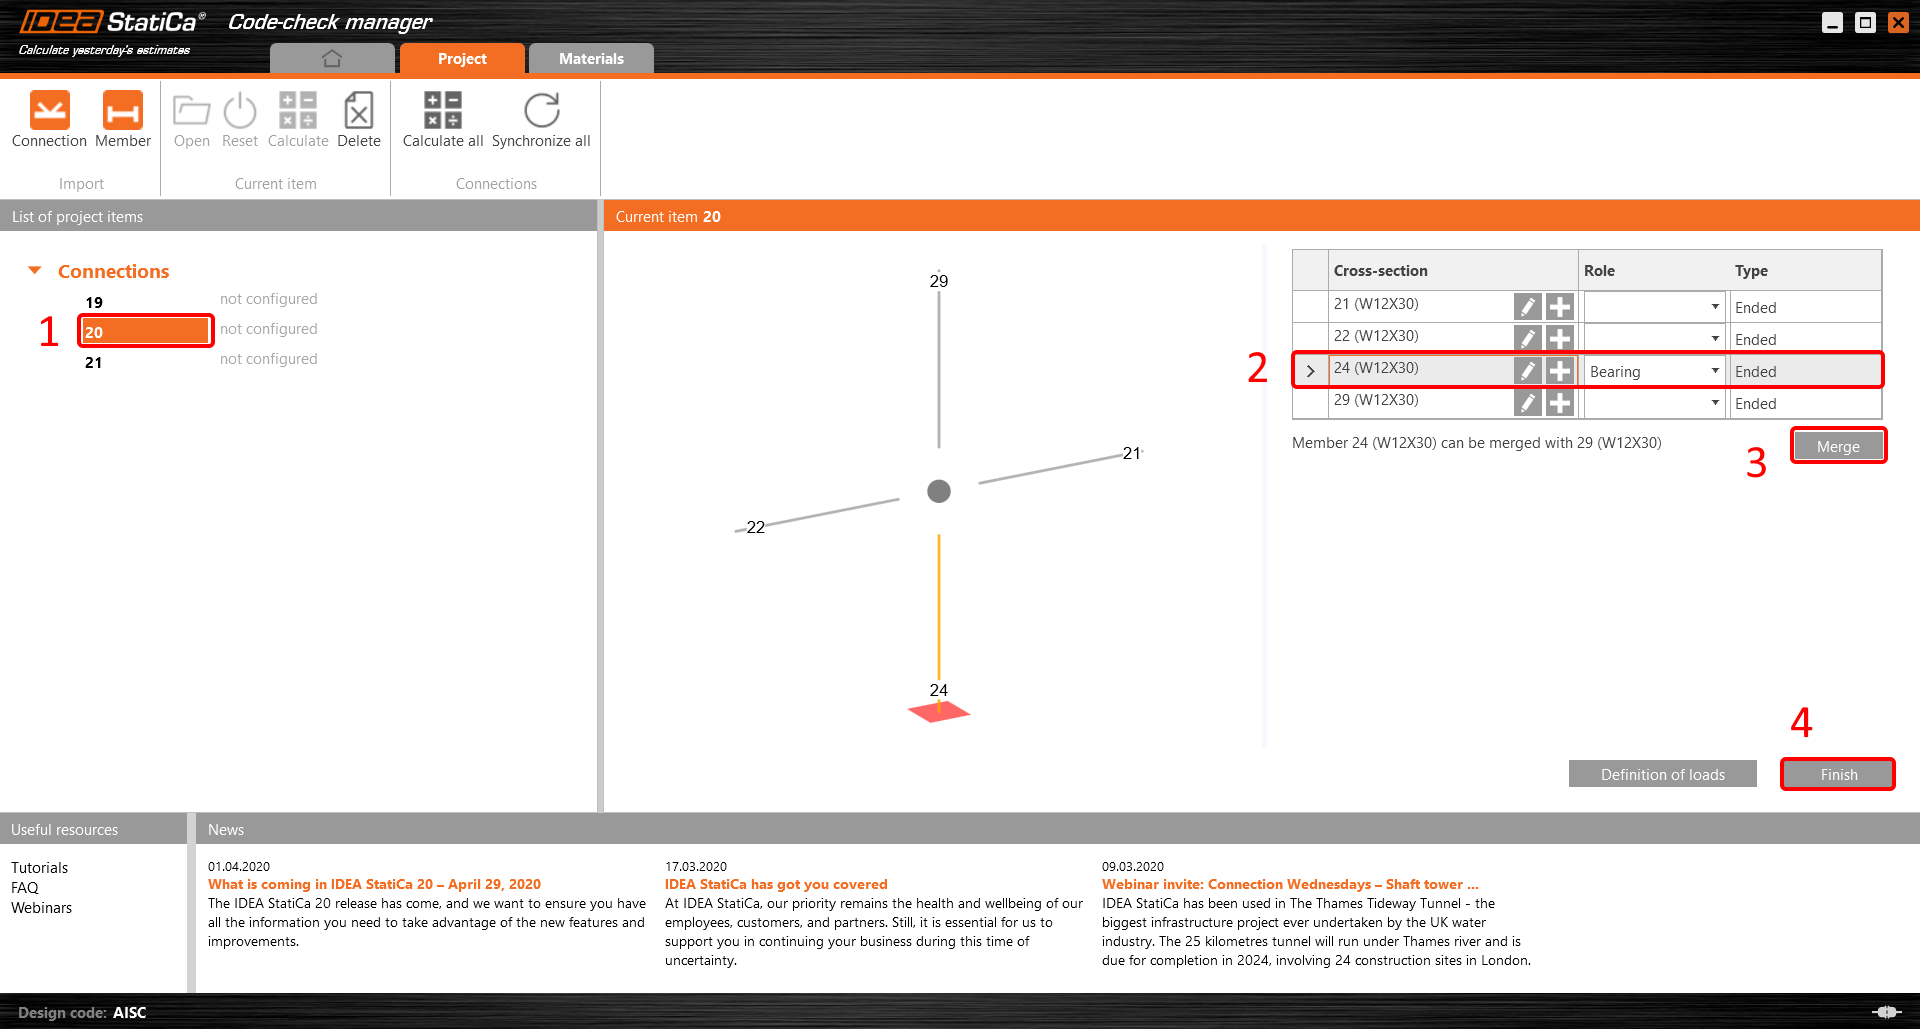
The joint is now ready to be opened in IDEA StatiCa Connection for the CBFEM analysis.

3 Design
Automatic data transfer is started and IDEA StatiCa Connection with a generated project is launched. All members and load effects were added automatically.
This tutorial works with imperial units. If you use metric units, you can switch them to imperial by clicking on the unit in the bottom part of the window.

Now you will define a set of manufacturing operations to model the connection between members. In the items tree, you right-click on Operations and select the option New operation.
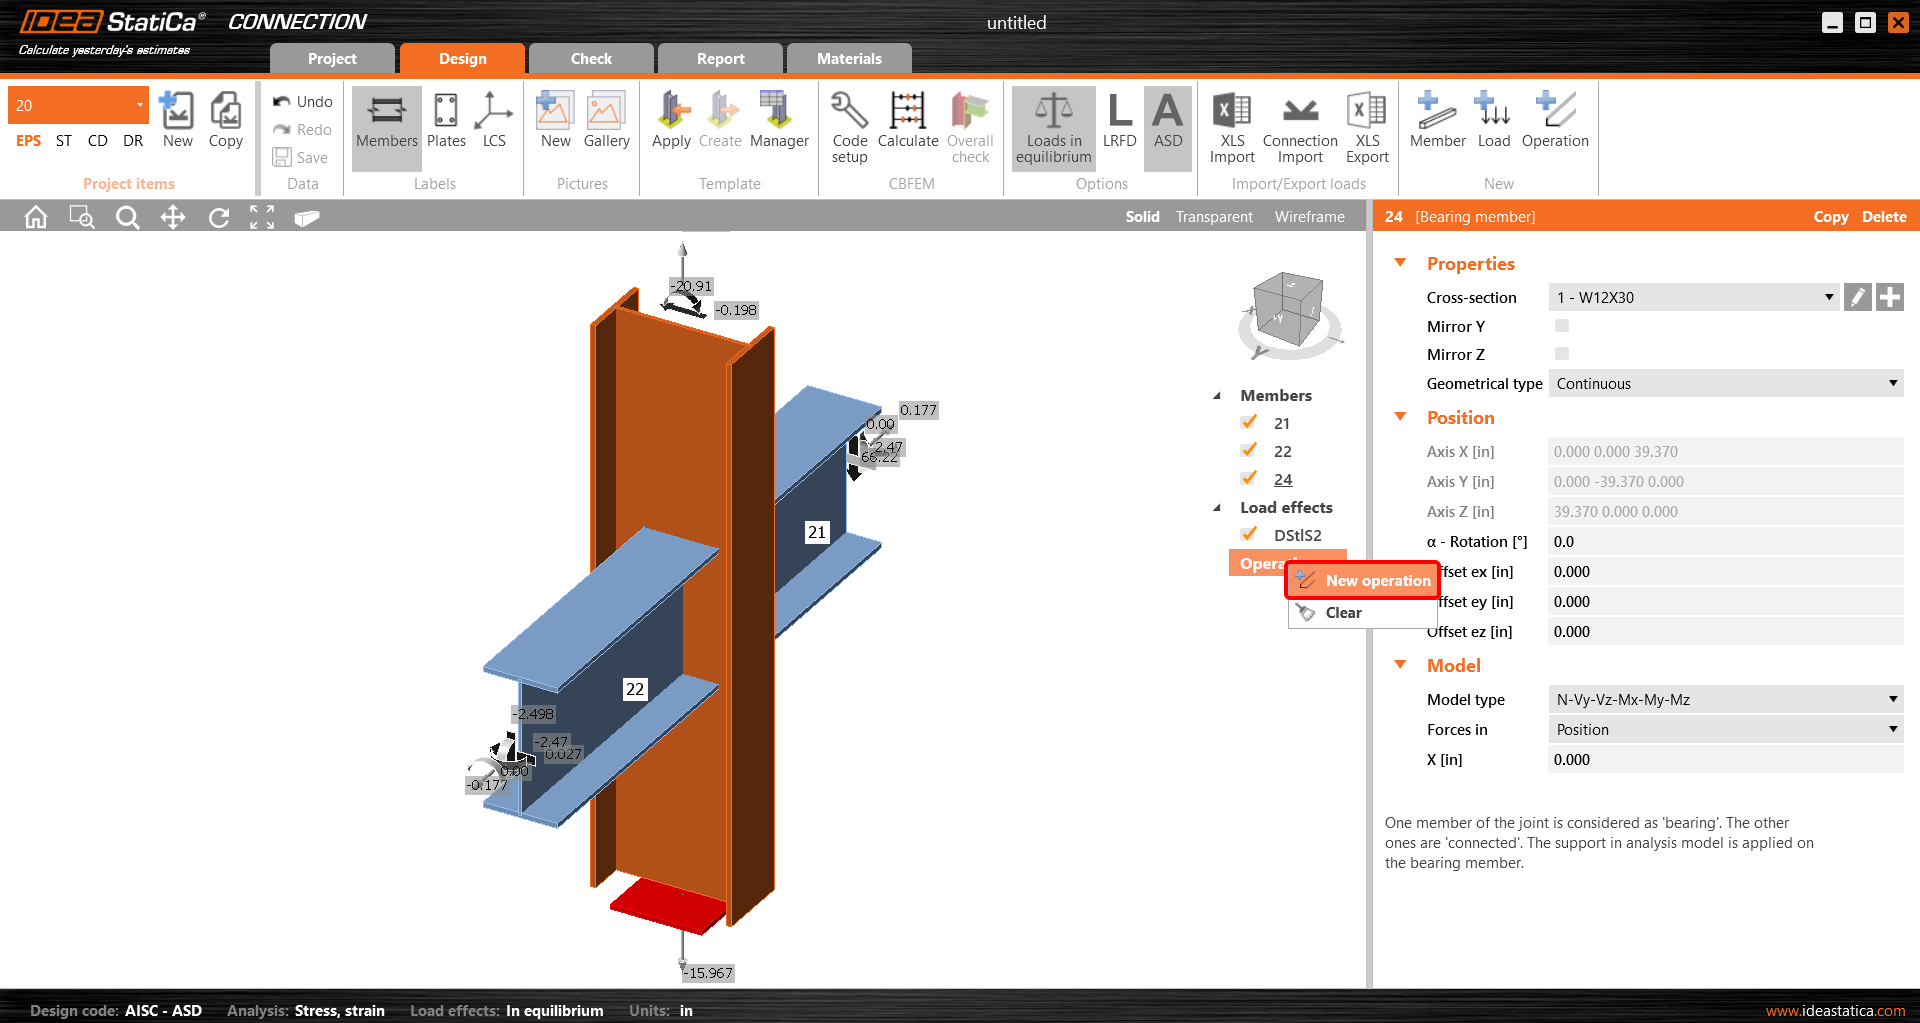
And you add the operation Cleat.


And set the properties of CLEAT1 as follows:

You can check the design of this simple joint.

4 Check
The analysis based on CBFEM is started by the icon Calculate from the top ribbon. The analysis model is automatically generated, the calculation is performed, and you can check the results.
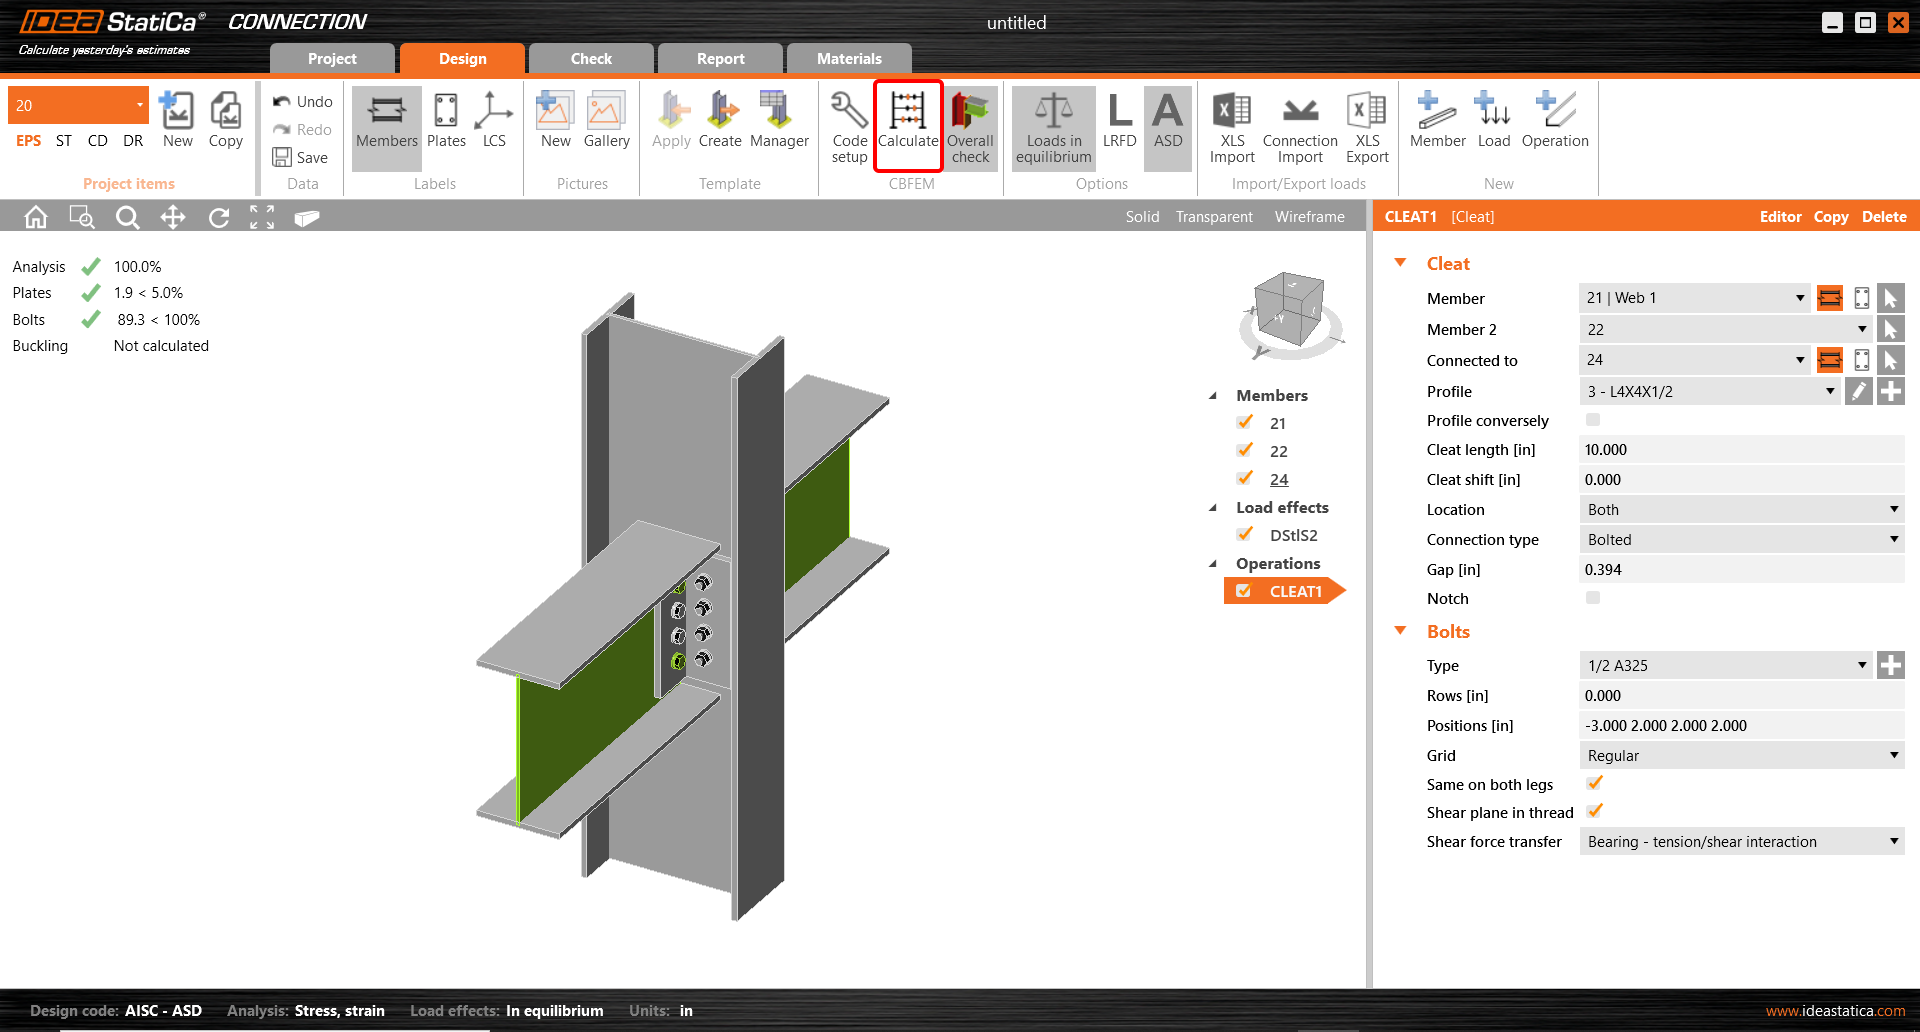
Activate Overall check, Equivalent stress, Mesh and Deformed from the ribbon to get a full picture of what is happening in the joint. Everything is displayed in the 3D window.

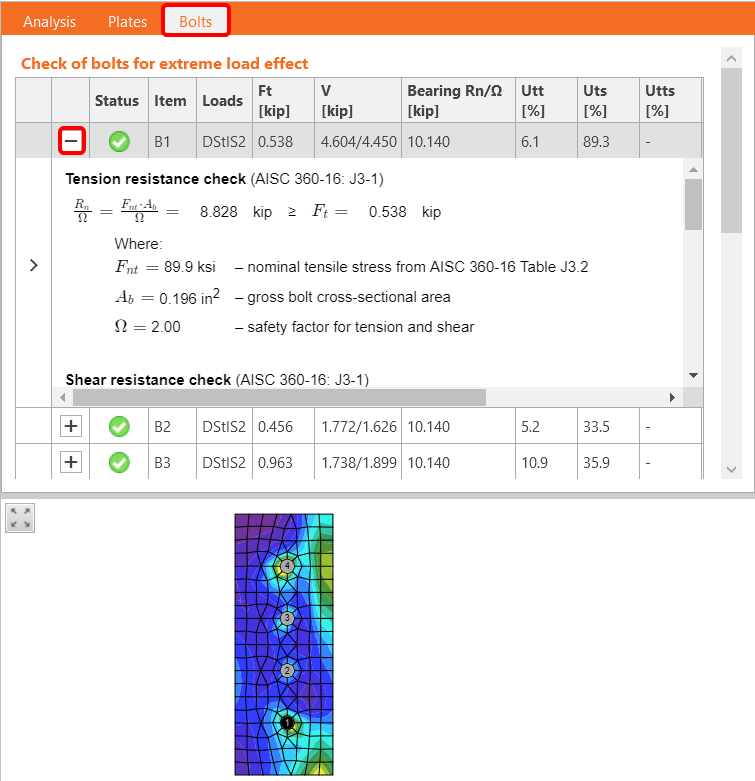
All values can be reviewed in detail in the tables and 2D windows. For example, to display the check of bolts, select the Bolts tab.
5 Report
At last, go to the tab Report. IDEA StatiCa offers a fully customizable report to print out or save in an editable format.

You have imported, designed, and code-checked a steel joint according to AISC.
6 Synchronize models
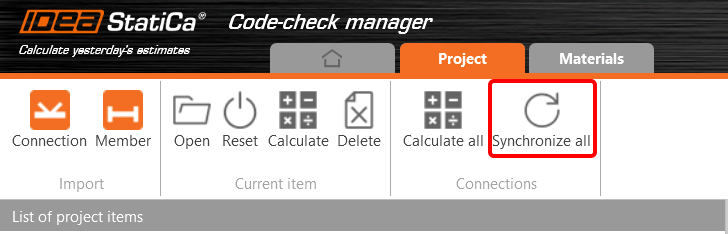
The Code-check manager is a BIM tool to export and synchronize connections from other programs. It is launched directly in the 3rd party applications via a command/icon.
Synchronize all - IDEA StatiCa detects changes in all already imported entities (changes in thickness, changes in cross-section, modification of properties of welds, bolts, etc.) and updates the project in IDEA StatiCa Connection.
Calculate - Synchronize and calculate the current item and provide a new set of results.
Calculate all - Synchronize and calculate all items and provide a new set of results.
Note
Kindly be aware that IDEA StatiCa syncs with a model of the 3rd party application, not the other way around.
Save the project in IDEA StatiCa and close the application Connection. All joints exported from the ETABS project to IDEA StatiCa are kept on the list inside ETABS.
Unlock the model and change the cross-section of member 22 from W12x30 to W12x26.

Run the analysis, select the export command in the upper ribbon, and in the Code-check manager, click on Synchronize.

In the next step, you can Open the joint in IDEA StatiCa Connection to explore the changes.
As you can see, the cross-section of the Member 22 has been changed, but all previous operations remained.

You have imported, designed, and code-checked a steel joint according to AISC.
Known limitations for ETABS and SAP2000
Concrete BIM link limitations
The following outlines the current limitations and considerations when using the ETABS/SAP2000 BIM link with IDEA StatiCa Checkbot and Detail 2D, highlighting potential constraints, common issues, and recommended practices to ensure accurate analysis and design.
Limitation: Import
If an ETABS load case contains analysis steps, IDEA StatiCa Checkbot will not be able to consider all of them.
- It is recommended to separate stepped load cases into individual load cases before import.
Limitation: Sync functionality
When syncing the model, load combination types are reset.
- The user must reassign the correct load combination types after each synchronization.
Limitation: Detail element creation
The following limitations apply when creating a Detail in Checkbot:
- Details can only be created for wall elements lying in the same plane.
- If the selected elements are not coplanar, an error will occur, and a different set of members must be selected.
Limitation: Detail Export
When exporting a Detail, the following limitations apply (a warning will be displayed in Checkbot when relevant):
- Out-of-plane uniform loads applied to 2D members are not transferred to Detail 2D.
- 2D members will not be merged if they have different thicknesses, materials, or in-plane loading values.
- Out-of-plane loading cannot be exported. A warning will appear if the total edge loading for a load case exceeds ±1 kN.
- Non-vertical 2D members should not be transferred to Detail 2D; the application is not suitable for such members.
Common issues with the workflow
- Concentrated point loads may cause nonlinear analysis failure. Add a transfer device (e.g., bearing plate) to distribute the load.
- A coarse ETABS or SAP2000 mesh (typical for global models) may cause stress peaks and produce unrealistic concentrated forces in both value and position for reinforcement design.
- Recommendation: Modify the mesh to 100 mm x 100 mm of imported wall elements.
- A coarse mesh can also cause significant in-plane moments that cannot be accurately captured in IDEA StatiCa.
- Recommendation: Set the out-of-plane stiffness of imported wall elements to a low value so that the surrounding structural elements in the global model can appropriately carry and transfer out-of-plane forces.
- If an edge point load creates tension on the edge (e.g., from lateral load), nonlinear analysis may fail.
- Recommendation: Move the point load slightly inward to ensure proper concrete engagement.

Steel BIM link limitations
The link now works for a wide variety of connections/joints. However, please take into account the yet unsupported functionality:
Limitation: Loads import
We do not support the import of load-combination which contains load-combination adding other than linear.
We do not support referencing of a load-combination inside another load combination.
Limitation: How to run SAP2000 and ETABS links with IDEA StatiCa 22.1.
Problematic versions:
- SAP2000 24.1.0
- ETABS 20.3.0
Problem description:
The new patch of SAP2000 24.1.0 does not work with the latest IDEA 22.1. Once you start Checkbot from the menu, it looks like this, and nothing can be done/clicked.
Solution:
This goes for SAP2000 and ETABS as well (latest versions). The workaround is to:
1. Locate the config file (either SAP2000.exe.config or ETABS.exe.config) in
C:\Program Files\Computers and Structures\SAP2000 24\
or
C:\Program Files\Computers and Structures\ETABS 20\
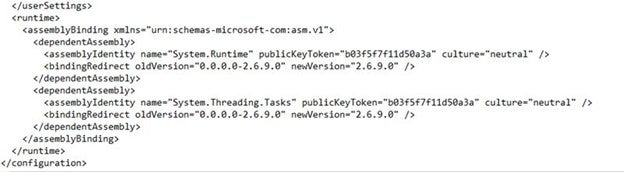
2. Delete the following lines from the bottom of the file and save it (requires admin rights).

Alternatively, copy the file to the desktop, edit it there, and copy it back to the original folder.
This is what the file should look like (its bottom part) after the assembly binding is properly deleted:
3. Then, it is possible to run Checkbot.
Limitation: Equilibrium
To ensure the equilibrium in the nodes, please set the End Length Offsets to 0:


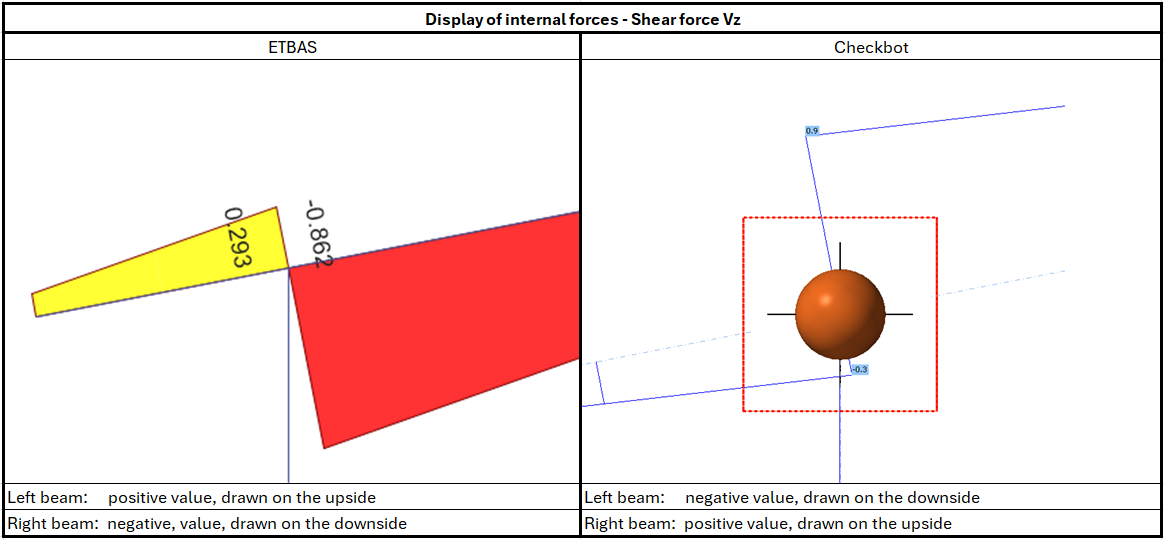
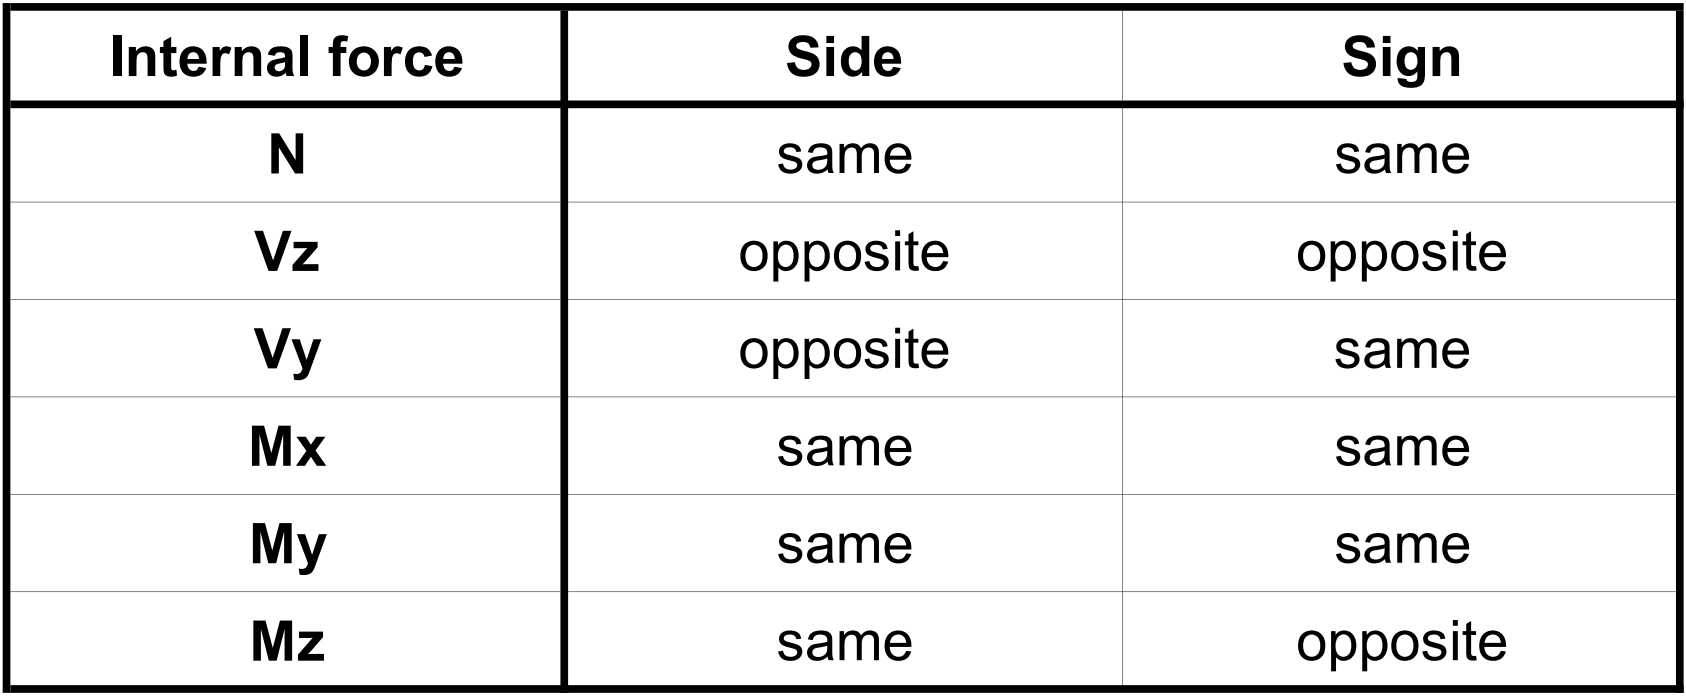
Limitation: Sign convention for internal forces
Due to different sign conventions in ETABS and in Checkbot, the internal forces are displayed differently. The load effects are applied correctly, but the internal forces may be displayed with the opposite sign and be drawn on the other side of the beam.
Limitation: More versions of SAP2000 or ETABS installed on the computer
ETABS and SAP2000 API uses COM library, which needs to be registered in registry. When you install new version, during the installation COM for this version is registered automatically. So when you then try to run the Checkbot link for older version, it doesn't work.
If you want to switch between those two versions, you have to:
1) Run as administrator the "UnregisterSAP2000.exe" or "UnregisterETABS.exe" in the folder with newer version.
2) Then Run as administrator the "RegisterSAP2000.exe" or "RegisterETABS.exe" in the folder with the older version.